The OCPP 2.0.1 device model is not just a cleaner schema. It changes how teams discover charger capabilities, manage configuration safely, and normalize mixed fleets during rollout.
What does the OCPP 2.0.1 device model change for deployers?
The OCPP 2.0.1 device model replaces the protocol's flat configuration store with a structured tree of components and variables, and that shift is one of the first places where "spec support" and "deployment readiness" diverge in production.
If you are implementing OCPP 2.0.1 in production, the device model is where vendor differences surface fastest. A charger can pass certification and still expose an inventory your backend cannot fully ingest, normalize, or write back safely.
For deployers, the real question is not whether a charger can technically answer GetVariables. It is whether your stack can:
- discover what the charger actually exposes
- tell standard components from vendor-specific ones
- write configuration safely without breaking field behavior
- monitor the right variables without flooding operations
- normalize 2.0.1 data into the same operational model as the rest of your fleet
If those pieces are weak, the device model becomes another source of rollout friction instead of the improvement it is supposed to be.
Why did OCPP 1.6's configuration model break down?
OCPP 1.6 modeled the entire charger as one flat list of string configuration keys, which works for a single-connector wallbox but collapses once a station has multiple EVSEs, connectors, and subsystems that each need their own addressable state.
In OCPP 1.6, charger configuration is a flat key-value store. You read and write configuration using GetConfiguration and ChangeConfiguration with keys like HeartbeatInterval, MeterValuesSampledData, or AuthorizeRemoteTxRequests.
This works fine for simple chargers. But modern charging stations are complex:
- Multiple EVSEs with different capabilities
- Multiple connectors per EVSE
- Network interfaces (cellular, Wi-Fi, Ethernet)
- Power electronics with independent control
- Display screens, RFID readers, payment terminals
Representing all of this as flat key-value pairs leads to naming nightmares: ConnectorPhaseRotation.1.1, ChargingScheduleAllowedChargingRateUnit.1. There's no structure, no hierarchy, no way to discover what a charger supports.
OCPP 2.0.1's device model fixes this completely.
How does the component-variable architecture work?
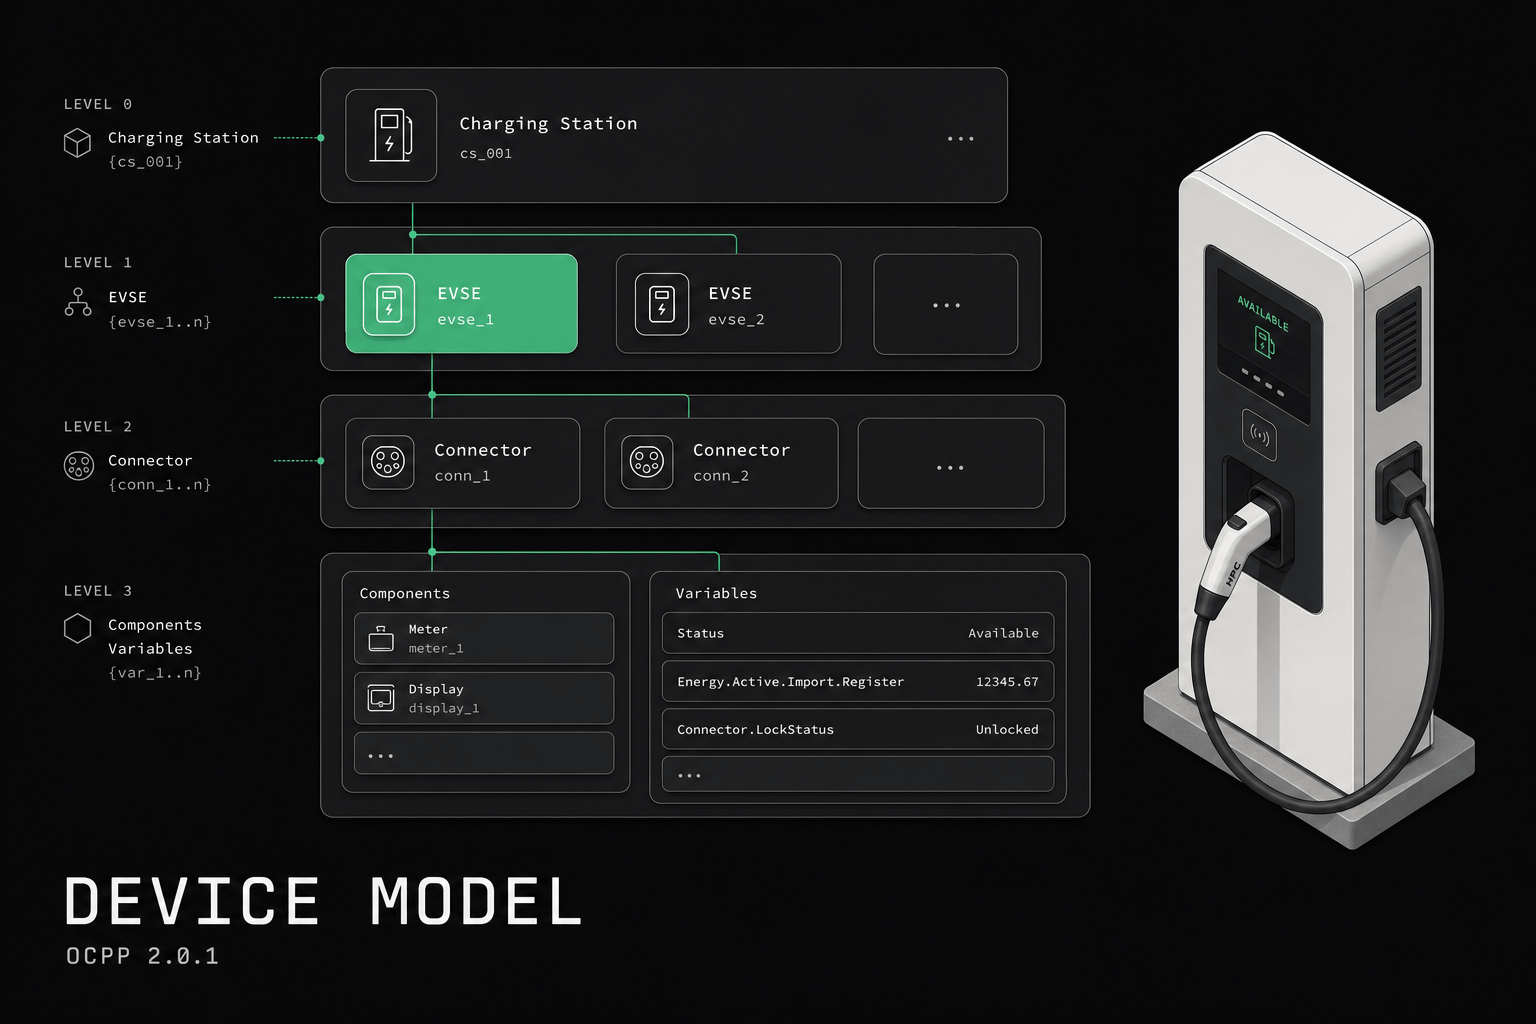
The device model is a tree of components, each with variables that describe its state and configuration. The Open Charge Alliance defines this structure in the OCPP 2.0.1 specification set, so standard component and variable names are portable across compliant vendors.
The diagram below shows the shape every 2.0.1 charger follows. A root ChargingStation component holds station-level variables, then nests one component per EVSE, each of which nests its own Connector components. Cross-cutting subsystems like the communication controller, token reader, and display sit alongside the EVSE branch as their own components. Read it as an addressing scheme: the path to any value is component, then optional instance and EVSE, then variable.
┌──────────────────────────────────────────────────────────────┐
│                     ChargingStation                           │
│                     (Root component)                          │
│                                                              │
│  Variables:                                                  │
│  ├─ Available (bool)                                         │
│  ├─ Model (string)                                           │
│  ├─ VendorName (string)                                      │
│  ├─ FirmwareVersion (string)                                 │
│  └─ Power (decimal, watts)                                   │
│                                                              │
│  ┌─────────────────────────┐  ┌─────────────────────────┐   │
│  │         EVSE 1          │  │         EVSE 2          │   │
│  │                         │  │                         │   │
│  │  Variables:             │  │  Variables:             │   │
│  │  ├─ Available (bool)    │  │  ├─ Available (bool)    │   │
│  │  ├─ Power (decimal)     │  │  ├─ Power (decimal)     │   │
│  │  └─ SupplyPhases (int)  │  │  └─ SupplyPhases (int)  │   │
│  │                         │  │                         │   │
│  │  ┌──────────────────┐   │  │  ┌──────────────────┐   │   │
│  │  │   Connector 1    │   │  │  │   Connector 1    │   │   │
│  │  │                  │   │  │  │                  │   │   │
│  │  │  Variables:      │   │  │  │  Variables:      │   │   │
│  │  │  ├─ Available    │   │  │  │  ├─ Available    │   │   │
│  │  │  ├─ ConnectorType│   │  │  │  ├─ ConnectorType│   │   │
│  │  │  └─ SupplyPhases │   │  │  │  └─ SupplyPhases │   │   │
│  │  └──────────────────┘   │  │  └──────────────────┘   │   │
│  └─────────────────────────┘  └─────────────────────────┘   │
│                                                              │
│  ┌────────────────┐  ┌────────────────┐  ┌───────────────┐  │
│  │ Controller     │  │ TokenReader    │  │ Display       │  │
│  │                │  │                │  │               │  │
│  │ Variables:     │  │ Variables:     │  │ Variables:    │  │
│  │ ├─ Identity    │  │ ├─ Available   │  │ ├─ Available  │  │
│  │ ├─ Interval    │  │ └─ Type       │  │ └─ Language   │  │
│  │ └─ Retries     │  │   (RFID/NFC)  │  │               │  │
│  └────────────────┘  └────────────────┘  └───────────────┘  │
└──────────────────────────────────────────────────────────────┘
Every physical or logical part of the charger is a component. Every property of that component is a variable.
Components in detail
A component in OCPP 2.0.1 is addressed by up to three fields that together form a unique path to any physical or logical part of the charger. That precise addressing is what lets a backend target one connector on one EVSE without ambiguity.
A component is identified by three fields:
- name — what it is (e.g., "EVSE", "Connector", "Controller")
- instance — which one, if there are multiples (e.g., "1", "2")
- evse — which EVSE it belongs to (for EVSE-scoped components)
This gives you a precise address for anything on the charger:
  Component: EVSE, instance: 1
  └─ Variable: Available → true

  Component: Connector, instance: 1, evse: {id: 1}
  └─ Variable: ConnectorType → "cType2"

  Component: Controller
  └─ Variable: HeartbeatInterval → 60
Standard components
OCPP 2.0.1 defines a set of standard components that all chargers should support:
| Component | Description |
|---|---|
| ChargingStation | The station itself |
| EVSE | Each charging point |
| Connector | Physical connector |
| Controller | OCPP communication controller |
| SecurityCtrlr | Security settings |
| AuthCtrlr | Authorization settings |
| TxCtrlr | Transaction settings |
| SampledDataCtrlr | Meter value configuration |
| MonitoringCtrlr | Monitoring and alerting |
| ClockCtrlr | Time synchronization |
| DisplayMessageCtrlr | On-screen messages |
| LocalAuthListCtrlr | Local authorization list |
| SmartChargingCtrlr | Smart charging capabilities |
| ReservationCtrlr | Reservation settings |
Vendors can add custom components for hardware-specific features.
What are OCPP 2.0.1 variables and attribute types?
A single OCPP 2.0.1 variable carries up to four attribute types, so one name like Power holds the live measurement and its configured bounds at once. This separation is what lets you read what a charger is doing and write what it should do without overloading a single field.
The layout below shows the four attributes for Power on one EVSE. Actual is the read-only live reading. MaxSet and MinSet are the writable ceiling and floor. Target is the writable setpoint you request. The charger resolves the effective output by clamping Target between MinSet and MaxSet, while Actual keeps reporting the real measurement independently. In mixed-vendor fleets, the common rollout surprise is a variable that advertises a writable attribute but silently rejects or clamps it on the hardware.
┌─────────────────────────────────────────────────────┐
│  Variable: "Power" on EVSE 1                        │
│                                                     │
│  ┌──────────────┐  ┌───────────────┐               │
│  │   Actual      │  │   MaxSet      │               │
│  │   (read-only) │  │  (read-write) │               │
│  │               │  │               │               │
│  │  Current      │  │  Maximum      │               │
│  │  power draw:  │  │  allowed:     │               │
│  │  15,400 W     │  │  22,000 W     │               │
│  └──────────────┘  └───────────────┘               │
│                                                     │
│  ┌──────────────┐  ┌───────────────┐               │
│  │   MinSet      │  │   Target      │               │
│  │  (read-write) │  │  (read-write) │               │
│  │               │  │               │               │
│  │  Minimum      │  │  Desired      │               │
│  │  allowed:     │  │  setpoint:    │               │
│  │  6,000 W      │  │  11,000 W     │               │
│  └──────────────┘  └───────────────┘               │
│                                                     │
│  Effective power = MIN(MaxSet, Target) = 11,000 W   │
│  Constrained by MinSet: must be >= 6,000 W          │
│  Actual shows real-time measurement: 15,400 W       │
└─────────────────────────────────────────────────────┘
Actual
The current, real-time value. Read-only. Updated by the charger as conditions change.
Examples:
Power.Actual= 15400 (watts currently being drawn)Temperature.Actual= 42 (degrees Celsius)Available.Actual= true (connector is available)
MaxSet
The maximum allowed value. Can be set by the CSMS to impose limits.
Examples:
Power.MaxSet= 22000 (don't exceed 22 kW)CurrentImport.MaxSet= 32 (max 32 amps)
MinSet
The minimum allowed value. Used to prevent settings below safe thresholds.
Examples:
Power.MinSet= 1380 (minimum charging power: 6A single phase)
Target
The desired setpoint. What you want the value to be.
Examples:
Power.Target= 11000 (we want this EVSE to deliver 11 kW)
How do you read the OCPP 2.0.1 device model?
OCPP 2.0.1 gives you two ways to read the device model: a targeted lookup with GetVariables for specific values, and a bulk inventory dump with GetBaseReport when you need the full picture. Most backends use both, targeted reads for live state and a full inventory on first connection.
GetVariables
Request specific variables by component and variable name:
Request:
  getVariableData: [
    { component: {name: "EVSE", evse: {id: 1}},
      variable: {name: "Power"},
      attributeType: "Actual" },
    { component: {name: "Controller"},
      variable: {name: "HeartbeatInterval"},
      attributeType: "Actual" }
  ]

Response:
  getVariableResult: [
    { attributeValue: "15400",
      attributeStatus: "Accepted" },
    { attributeValue: "60",
      attributeStatus: "Accepted" }
  ]
GetBaseReport
Request a complete dump of the device model:
Request:
  requestId: 1
  reportBase: "FullInventory"

The charger responds with multiple NotifyReport messages
containing ALL components and variables.
FullInventory returns everything. ConfigurationInventory returns only configurable variables. SummaryInventory returns a summary.
How do you write to the OCPP 2.0.1 device model?
Writing configuration uses SetVariables, which targets a specific component, variable, and attribute type, then returns a per-variable status. The status matters as much as the write itself: a RebootRequired or Rejected result is the difference between a config change that took effect and one that silently did not.
SetVariables
Change one or more variables:
Request:
  setVariableData: [
    { component: {name: "Controller"},
      variable: {name: "HeartbeatInterval"},
      attributeType: "Target",
      attributeValue: "30" }
  ]

Response:
  setVariableResult: [
    { attributeStatus: "Accepted" }
  ]
Possible responses: Accepted, Rejected, RebootRequired, NotSupportedAttributeType, UnknownComponent, UnknownVariable.
How does device model monitoring work?
The device model also supports monitoring: instead of polling, you tell the charger to push a NotifyEvent when a variable crosses a threshold, changes by a delta, or on a periodic schedule. This turns the backend from a poller into a listener for the variables that actually matter.
The example below sets an upper-threshold monitor on Temperature for one EVSE. When the live reading passes the configured limit, the charger emits a NotifyEvent carrying the component, variable, value, timestamp, and severity, so the backend has everything it needs to act without a follow-up read. The four monitor types, upper threshold, lower threshold, delta, and periodic, cover most operational alerting. The practical risk is over-subscribing: too many monitors at low severity generate event volume that buries the signals you care about.
┌─────────────────────────────────────────────────────┐
│  Monitor: Temperature on EVSE 1                     │
│                                                     │
│  Type: UpperThreshold                               │
│  Value: 70 (degrees Celsius)                        │
│  Severity: 2 (critical)                             │
│                                                     │
│  When Temperature.Actual > 70°C:                    │
│    → Charger sends NotifyEvent to CSMS              │
│    → Event includes component, variable, value,     │
│      timestamp, and severity                        │
│                                                     │
│  Monitor types:                                     │
│  ├─ UpperThreshold (value exceeds limit)            │
│  ├─ LowerThreshold (value drops below limit)        │
│  ├─ Delta (value changes by more than X)            │
│  └─ Periodic (report value every N seconds)         │
└─────────────────────────────────────────────────────┘
You set monitors via SetVariableMonitoring and receive alerts via NotifyEvent.
Deployment checklist before you rely on the device model
A device model is "ready" only when you have validated it against real hardware, not against the spec or a vendor datasheet. The six checks below are where conceptual understanding and operational reality usually part ways during a 2.0.1 rollout.
Before you call a 2.0.1 rollout "ready," validate these points against real hardware:
- Inventory completeness
Can the charger return a usable
FullInventoryorConfigurationInventorywithout truncation, timeout, or undocumented omissions? - Write permissions Which variables are truly writable, which require reboot, and which are marked writable in theory but rejected in practice?
- Vendor extensions Which non-standard components and variables matter for your hardware, and how are they represented in your internal data model?
- Report size and performance
How large are
NotifyReportpayloads, and can your backend ingest them without breaking observability or queueing? - State normalization How do you map 2.0.1 component-variable data into the same operational views used for 1.6 chargers?
- Monitoring noise Which monitors are essential for operations, and which ones generate event volume without operational value?
If your team has not tested those six areas, you probably understand the device model conceptually but not operationally.
How does OCPP 2.0.1 configuration compare to OCPP 1.6?
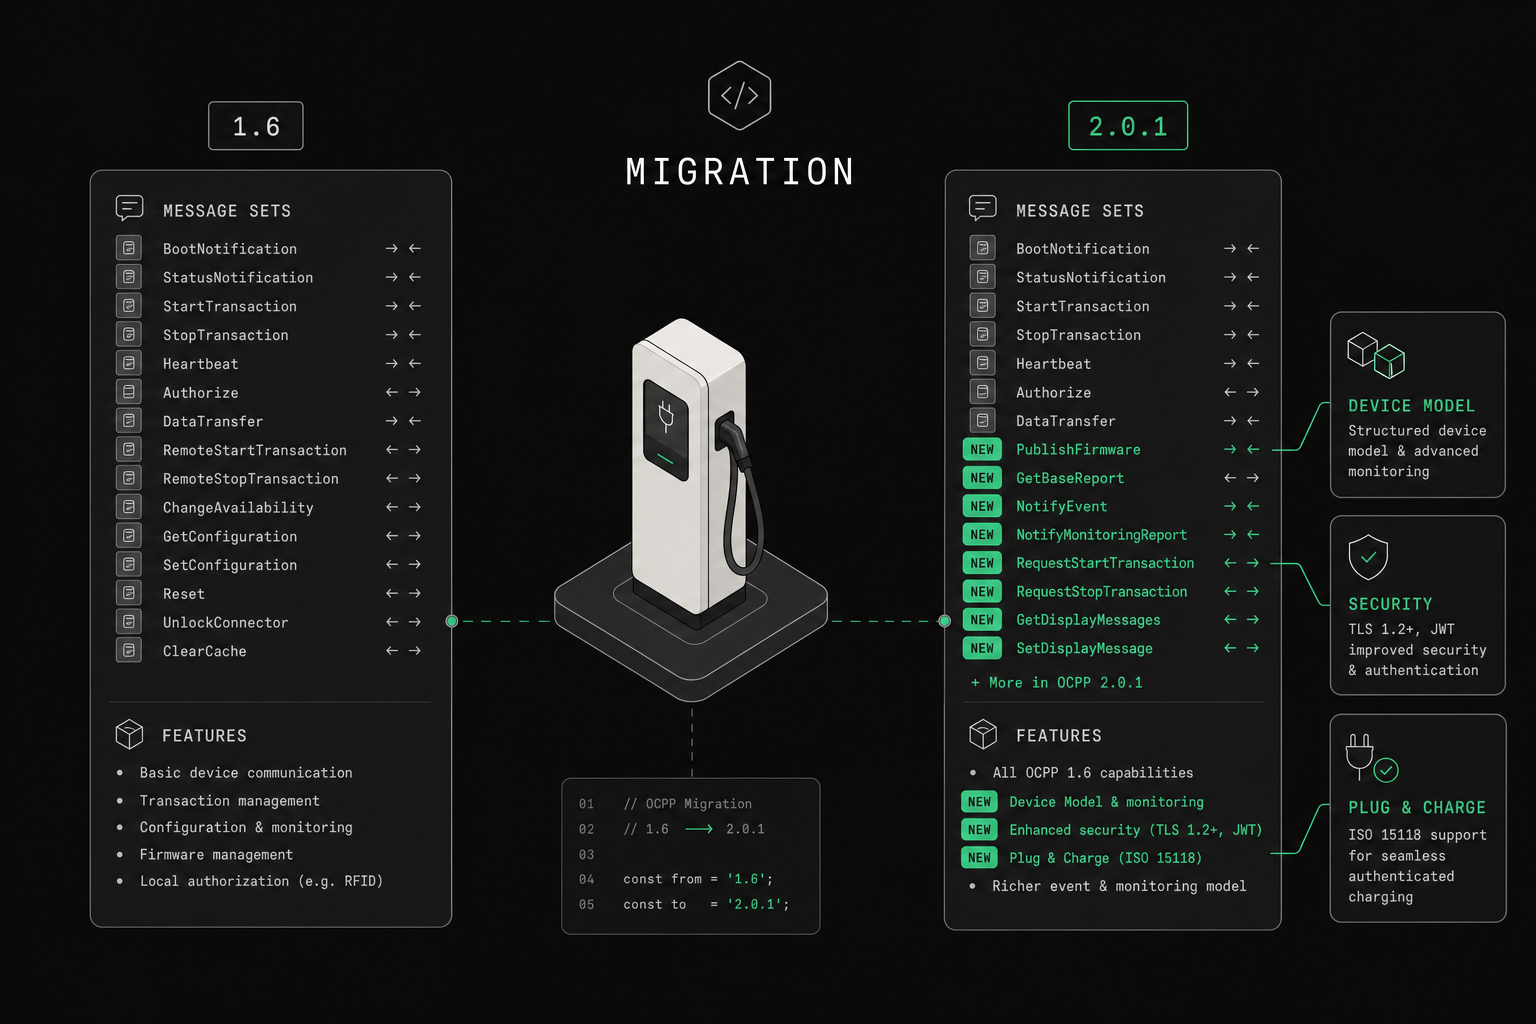
OCPP 2.0.1 replaces 1.6's flat, string-only key-value store with a hierarchical, component-scoped model that adds typed data, real-time values, native multi-instance addressing, and built-in monitoring. The table below summarizes the differences that matter most during a rollout.
| Aspect | OCPP 1.6 | OCPP 2.0.1 |
|---|---|---|
| Structure | Flat key-value | Hierarchical component-variable |
| Discovery | GetConfiguration (all keys) | GetBaseReport (structured inventory) |
| Scope | Station-wide only | Component-scoped (station, EVSE, connector) |
| Data types | String only | String, Integer, Decimal, Boolean, DateTime |
| Read/write | GetConfiguration / ChangeConfiguration | GetVariables / SetVariables |
| Monitoring | None (poll only) | Built-in threshold and delta monitoring |
| Real-time values | No (configuration only) | Yes (Actual attribute type) |
| Multiple instances | Naming convention (key.1, key.2) | Native EVSE/instance addressing |
How ev-cloud uses the device model
The practical goal is to turn the raw component-variable tree into something operators can actually use across a mixed fleet. ev-cloud does this by discovering the model on connect, then mapping both 1.6 and 2.0.1 chargers into one consistent operational view.
- Auto-discovery — on first connection, ev-cloud requests a full inventory and builds a live model of the charger's capabilities
- Configuration management — view and edit all variables from the dashboard, with change tracking
- Real-time monitoring — automatic monitors on critical variables (temperature, power, availability) with alerting
- Fleet-wide policies — set configuration templates and apply them across charger groups
- OCPP 1.6 compatibility — for 1.6 chargers, ev-cloud maps flat configuration keys into the device model structure for a unified interface
Next step for rollout teams
If the device model is part of an active 2.0.1 rollout, continue with:
- OCPP 2.0.1: what actually changed for message-level migration impact.
- OCPP 1.6 to 2.0.1 migration guide for coexistence strategy.
- How to evaluate an OCPP platform if this affects vendor selection, tooling, or rollout architecture.
Learn more about OCPP in our ultimate guide to OCPP.